Quantcast
Channel: A Clean Bake

10 Vegan & Paleo Side Dishes, and the Benefits of Meatless Meals

$
0
0

These vegan paleo side dishes allow you to reap the health benefits of both the paleo diet and the vegan diet, but without sacrificing flavor or enjoyment! Serve these easy sides with your next dinner – they’re all easy enough to whip up tonight!

Paleo Vegan Side Dishes that are so easy to make #glutenfree #paleo #vegan #recipes #sidedishes #glutenfreerecipe #glutenfreedinners #Paleorecipes #paleodinners #veganrecipes #vegandinners #vegansnack #vegansidedish #veganappetizer #paleoappetizers #paleosidedishes #easydinners #healthydinners #healthydinnerrecipes

People who follow a gluten free & paleo diet swear by it for everything from reducing inflammation to natural diabetes management and blood sugar regulation to gut health.

But those who follow the vegan diet (i.e. eliminate all animal products from their diets) claim just as many health benefits from practically the opposite eating style: those who eat eat mostly plants (or all plant-based foods) swear that it helps them combat heart disease, overcome obesity and promote weight loss, and increase energy.

Paleo + Vegan = Pegan

Then there’s a third camp, which follows a vegan paleo diet (yep, this is an actual thing). These people only eat food that is part of both the paleo diet and the vegan diet, meaning their food is free of gluten, grains, refined ingredients, and animal products. They call it Pegan. (Pronounced “pee-gahn,” not “pay-gahn” like the black magic religion. That’s for another blog.)

When I first found out about the pegan diet, I assumed followers of this diet must not be able to eat much more that bananas and peanut butter. But lately, my family of meat eaters has been eating vegetarian and vegan meals ore often and the marriage of the paleo diet and the vegan diet has started to make more sense to me.

The benefits of going meatless in a healthy way once a week or so are numerous:

  • A plant-based diet is better for the environment.
  • Organic, high quality fresh produce is cheaper than the equivalent quality animal foods (i.e. grass-fed beef or other grass-fed meat), so paleo dieters stand to save some money by swapping a meat-heavy meal for one that is plant-based.
  • It’s easier to cook, and many meatless recipes are raw too – perfect for summer!

In the spirit of Meatless Mondays, I’d like to share a handful of vegan paleo side dishes to round out your meal. Simply pair them with a high protein entree (I recommend this baked tofu, if you can tolerate soy, even though it is not one of my paleo recipes) for a meatless meal that is part of a healthy diet!

Vegan Paleo Side Dishes

Ratatouille

Ratatouille sounds fancy and complicated, but it is actually a fast, easy and flavorful meal that is perfect for weeknight dinners!

This is, by far, the most popular recipes on my site, and with good reason. It’s versatile, adaptable, and a perfect make ahead option (follow the cooking instructions, cool completely, and freeze in an airtight container). It’s been pinned on Pinterest nearly half a million times!

Dozens, probably hundreds, of readers have made it and put their own stamp on it: they’ve served it over quinoa, under cheese, alongside just about every protein you can imagine, and doubled the recipe to feed a crowd. Pin it, print it, and make it – you won’t be sorry!

Get the recipe here.

Roasted Beets

How to Roast Beets (To Make Delicious Roasted Beets!) #glutenfree #paleo #vegan #lowcarb #healthy

This method works for roasting just about any root veggie (I recommend carrots and turnips!) but you should definitely start with the beets. Those poor red blobs get such a bad reputation, thanks to those bland, floppy canned beets that most people think of first.

After you try this recipe, which lets the pure flavor of the fresh beets shine through, enhanced only by a dab of olive oil and a pinch of salt, you’ll never not think of beets are tender, sweet, veggie candy that they can (and should) be.

Get the recipe here.

Jerusalem Salad

Fresh, crisp and hydrating Jerusalem Salad - you'll want to eat this every day this summer! (It's raw, vegan, gluten free and paleo, too!)

I sincerely hope that you have a fresh, crunchy cucumber and a juicy bunch of sweet tomatoes on your counter all summer long, because you’ll never go hungry again. It’s truly incredible what you can do with fresh veggies, good quality olive oil, and a generous pinch of salt. This salad goes by many names, but whatever you call it, it’s always satisfying!

Get the recipe here.

Homemade Creamy Tomato Soup

Cream of Tomato Soup (Vegan and Paleo)

This is another one of those mega-fan faves. If you ever enjoyed a bowl of Campbell’s tomato soup, or have any desire to re-enact the commercials without ingesting all kinds of artificial ingredients and other nonsense, this is the soup for you.

If you only have 15 minutes to get dinner on the table, this is also the soup for you! I highly recommend it with some good bread (<– not vegan!) or a grilled cheese, on the side, for dunking.

Get the recipe here.

Moroccan spiced carrots

Easy Moroccan Spiced Carrots

You’d never know that such a complicated-flavored recipe was so easy to make. The secret is ras el hanout spice mix (available online), a bold blend of smoky flavor like cumin, warm flavors like cinnamon and cloves, and a little bit of heat from something like chili powder. There is no definitive recipe for it, so every brand and recipe is a little different, but it is always a perfect compliment to the sweetness of lightly steamed carrots.

Since this dish is meant to be served cold, this is also a great meal prep option!

Get the recipe here.

Guacamole

Guacamole Made In the Food Processor

You can serve this as a side with chips or veggies for dipping, or as a condiment, to slather veggie burgers with. What isn’t improved by guacamole, really?

The best part about this recipe is how low maintenance it is, even compared to other (admittedly easy) guac recipes. All this one requires is a few minutes of rough chopping, and then you let the food processor do the rest.

Get the recipe here.

Spinach Chips

Homemade Sea Salt and Lime Spinach Chips (Vegan, Gluten-Free, Grain-Free, Paleo)

Remember when kale chips were everywhere but no matter how trendy they got, that didn’t change my inability to tolerate kale? Just me? Well, my point is that if you enjoy kale chips, or if you don’t enjoy them, you’ll love their more delicate counterpart in homemade sea salt and lime spinach chips.

All you need is a sheet pan and an oven and you’ll have an unexpected, casual side dish in no time!

Get the recipe here.

Garden salad with Apple Cider Vinaigrette

Clean-Eating-Vinaigrette

It’s the easiest side dish in the world, but let’s not overlook the merits of a simple side salad. The trick to making it something special is to serve it with an exceptional dressing. Apple cider vinegar dressing packs an acidic zing, but is balanced with just enough sweetness from a splash of maple syrup.

Get the recipe here.

Simple White Rice

Slow Cooker Rice for a great side dish - How To Cook Rice In The Crock Pot (gluten free and paleo side dish)

This is another simple, versatile side dish that will get you far. I make huge batches of white rice in my slow cooker and use them for side dishes throughout the week. Make it ahead of time, season it with olive oil, herbs, and spices, and reheat it just before the meal.

Get the method for rice in the slow cooker here.

Carrot Fries

Baked Shoestring Carrot Fries with Green Tahini Dipping Sauce

If carrot fries sound a little strange, it’s only because you haven’t tried them yet. It makes sense: carrots are starchy root vegetables, just like potatoes, whose natural sugars caramelize into the crisp edges that you demand from your fries – no frying required.

These oven fries are such a satisfying side dish that you practically don’t need a main course!

Get the recipe here.

Spaghetti with Roasted Tomatoes, Capers, and Pine Nuts

Gluten Free Quinoa Spaghetti with Roasted Tomatoes and Pine Nuts - A perfect weeknight meal!

This is a side dish that could be an entree if you were in a hurry. A word of caution though: as written, this is not paleo. In order to make it paleo, replace the quinoa noodles with:

  • Spaghetti squash
  • Spiralized vegetable noodles (like zucchini or butternut squash)
  • Rice noodles
  • Store bought grain free noodles (like Cappello’s)

Get the recipe here.

Ricotta and Sage Stuffed Mushrooms

The homemade vegan ricotta in this recipe is incredibly versatile, but one of the best uses for it is to stuff tender portobello mushroom caps for a hearty side dish with tons of flavor. This is the kind of dish that makes you forget that there’s no meat on the table – really!

Get the recipe here.

Coconut Curry Butternut Squash Soup

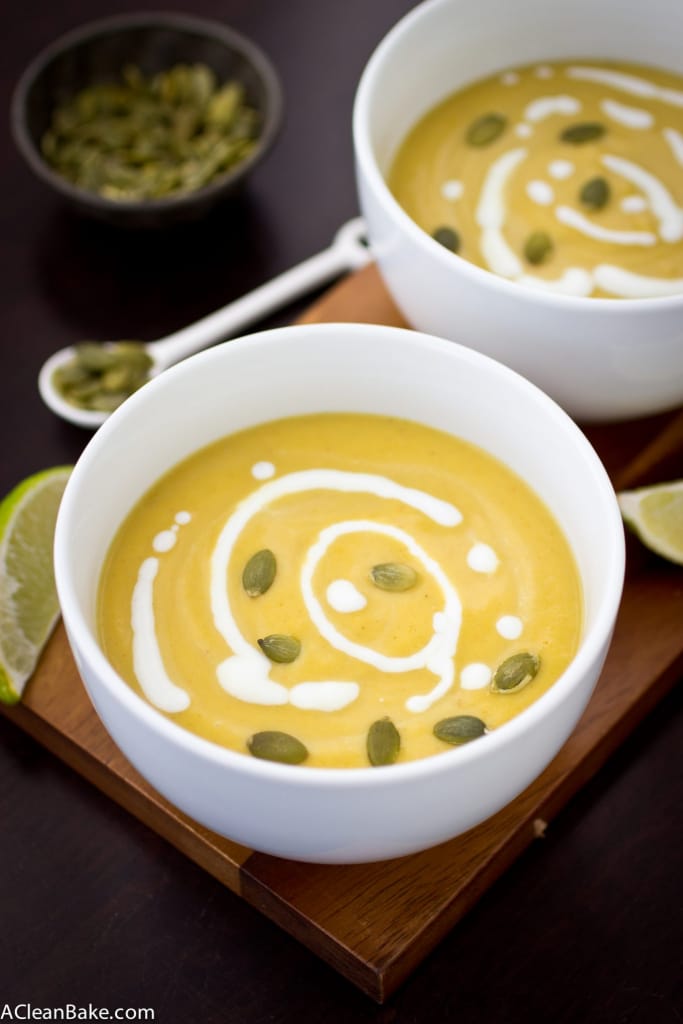
Squash-based soups are one of the easiest vegan paleo side dishes because they require so little effort for such delightful flavor and texture. Just a few ingredients make up this sweet and spicy dish.

The starchy squash makes the soup naturally very thick and smooth, but the added coconut milk makes it ultra rich and creamy. It’s one of those dishes that feels like a weekend meal, but is made for weeknights.

Get the recipe here.

Roasted Garlic Babaganoush

Roasted Garlic Babaganoush (gluten free, grain free, vegan and paleo friendly)

This, like the soup above, is another one of those recipes that tastes like so much more than the sum of its parts. The prep is simple: just throw everything in the oven, then blend. But the dip is velvety smooth, rich, slightly smoky and very pungent – and it goes with nearly everything. Serve it with crackers or veggies, use it as a sandwich spread, dip those carrot fries in it!

Get the recipe here.

Roasted Carrot Salad

This salad is, in my opinion, the single most underrated recipe on my site. If that, alone, isn’t enough to convince you to try it, imagine bright, sweet flavors, a melange of texture, and crunchy base of tender, fresh greens.

Get the recipe here. (Don’t forget to leave out the goat cheese and replace the honey with maple syrup in the dressing, or use the apple cider vinaigrette linked above.)

You can check out all of the vegan recipes on my site here!

This post contains affiliate links, which means that if you click through and purchase a product, A Clean Bake receives a small commission. All proceeds go toward continuing to bring you delicious, healthy recipes every week, and this does not affect the price you pay. Thanks for supporting A Clean Bake!

The post 10 Vegan & Paleo Side Dishes, and the Benefits of Meatless Meals appeared first on A Clean Bake.


Veggie Fritters (Gluten Free & Paleo)

$
0
0

Paleo gluten free vegetable fritters are a quick, easy, and flexible way to eat your veggies. Pan fried until crispy, these low carb fritters are so satisfying – and kids love them too! Each of these fritters packs a full 1/3 cup of shredded carrots, zucchini, and yellow squash, making it easier than ever to get your daily veggies!

Paleo gluten free vegetable fritter with yogurt sauce on a plate

I have so many chocolate recipes in the can, that I was ready to share with you this week. 

But when I asked you on Instagram what you preferred to see this week, you surprised me: Savory! 

No problem, because after being sick twice in about 3 weeks, I’ll take all the healthy, veggie-packed recipes I can get. I assume you’re in the same boat. 

Have you ever made veggie fritters?

If not, you have to give these a try, like, tonight. 

They’re one of the more enjoyable ways to eat your veggies, nestled in a pillowy dough and lightly fried until golden brown. While these may taste like “veggies light” in the sense that the vegetable flavor and texture is distracted from, if not mostly masked, by the dough they’re definitely not light on the veggies. 

Large bowl of shredded veggies for Paleo Gluten Free vegetable Fritters

There is a full 3 1/2 cups of shredded mixed vegetables in the recipe. That’s about 1/3 cup of vegetables per fritter! 

Which vegetables should you use?

The recipe calls for a mix of zucchini, carrots, and summer squash. I find that both carrots and zucchini are easy to find all year round, but summer squash (yellow squash) can be a little hit or miss. If you need to replace the summer squash, you can just leave it out and use more zucchini or carrots to make up the difference. 

Paleo gluten free vegetable fritters in a cast iron pan

How to cook the fritters perfectly every time

If not cooked properly, you could end up with fritter failure: burned outside with soggy raw innards. But don’t worry: there are two very easy tricks to making sure these come out of your pan perfectly cooked and golden brown.

First, make sure you’re using a pan that distributes heat evenly. Lightweight nonstick pans are affordable and easy to use, but they just don’t cook food evenly. Instead, reach for a heavy skillet, made of a material like cast iron. Yes, it’s heavy and can be cumbersome, but it’s the only pan I use for this sort of cooking because it holds and distributes heat so well. If you don’t have cast iron, stainless steel works too. In either case, make sure your pan is hot, but not overheated, and the heat stays steady so that your fritters cook through without drying out. 

Pile of paleo gluten free vegetable fritters

Second, make sure you’re using the right oil and the right amount of it. I love (LOVE!) olive oil in my kitchen, but you’ll notice the recipe calls for avocado oil for frying. Why? The smoke point (which is exactly what it sounds like) of olive oil is around 400 degrees, while the smoke point of avocado oil is closer to 500 degrees, or higher. I recommend using avocado oil for frying these since the pan will be quite hot and stay that way for a long time, which is a perfect storm for smoking up your kitchen, setting the fire alarm off, and making every dog in the neighborhood go bananas. 

As for how much oil to use, do not skimp – especially if you’re using the cast iron or stainless steel pans I recommend. Both of those pans need a sufficient fat barrier between the cooking surface and the food in order to prevent the food from gripping the metal and hopelessly sticking. You’ll know you have enough oil when the bottom of the pan shimmers, and don’t forget to replenish the oil in the pan between batches of fritters. Don’t worry about your fritters getting too greasy; you’ll drain any excess oil by laying them on a paper towel for a few minutes before you eat them. 

Plate of paleo gluten free vegetable fritters


How to make these nut free

In order to make the fritters nut free, you will need to replace the almond flour with something – obviously. 

If all you have on hand is coconut flour, you can use a little more than the recipe calls for. So, omit the almond flour and use 3-4 tablespoons total of coconut flour (the original 2 in the recipe, plus 1-2 more). Let the batter sit 5 minutes, then determine if you need any more. The mix should still be a little wet, but should hold together when you press a palmful of it into a ball, then flatten it slightly into a fritter. 

If you happen to have cassava flour on hand, this might work a little better than an all-coconut flour fritter. Use the original 2 tablespoons of coconut flour that are called for in the recipe, and then add 2-3 tablespoons of cassava flour (or as needed; try the test I laid out above) in place of the almond flour.

Close up of paleo gluten free vegetable fritter with yogurt sauce

How to make these egg free

I get this question a lot, which is why I am addressing it. Unfortunately, I don’t have a perfect replacement for the eggs in this recipe. They act as a vital binding agent; as they cook, they stabilize the structure of the fritter, preventing it from falling apart after it’s cooked. 

Flax eggs or chia eggs, while a convenient replacement, just don’t have the same strength that an egg does when it comes to binding. If you’ve tried replacing the egg in any of my baked recipes, you know that they come out delicate and crumbly – too much so. 

Since the success of these fritters depends so critically on successfully binding together, I’m reluctant to advise you to leave the eggs out. Without something to hold them together well, these fritters turn into a doughy hash which is, let’s face it, not super appetizing. If you have a reliable egg replacement that you trust, feel free to use it. But I have not tested this recipe with any egg replacements, so I can’t guarantee that it will work well. 

Plate of gluten free vegetable fritters with yogurt sauce

How to serve the fritters

These fritters are best fresh from the pan, after a few minutes sitting on a paper towel to drain the excess oil. 

While they’re draining, you have just enough time to whip up an easy dipping sauce made from Greek yogurt, feta cheese, lemon juice, dill, salt, and pepper. If you need to stay dairy free, use your favorite vegan plain yogurt, skip the feta, and increase the salt to taste. 

Once the fritters are drained, but still warm, pile them on your plate and top with a generous dollop of the dipping sauce to enjoy. They make a very nice light dinner on their own, but if you’re looking for something a little more filling, they pair really well with my chicken shawarma

If you want to make them ahead of time, cook them until they’re just barely brown, and store in the fridge. Then heat and brown them in the pan before you’re ready to serve. They also make great leftovers; reheat in a pan or in the microwave before you dig in! 

Grain Free Veggie Fritters

Ingredients for the fritters

  • 3 1/2 cups shredded zucchini, carrots, and summer squash ((see note))
  • 1/3 white onion, (shredded)
  • 1/2 teaspoon sea salt
  • 2 large eggs, (lightly beaten)
  • 2 tablespoons fresh parsley, (minced, or 1 1/2 teaspoons dried oregano)
  • 1/2 teaspoon granulated garlic
  • Rounded 1/4 teaspoon cumin
  • 1/4 teaspoon chili powder
  • 1/4 teaspoon black pepper
  • 1/4 cup blanched almond flour
  • 2 tablespoons coconut flour
  • 2-4 tablespoons avocado oil, (for frying )

Ingredients for the dipping sauce

  • 1/2 cup plain Greek yogurt
  • 1/4 cup finely crumbled feta cheese
  • 2 Tablespoons lemon juice
  • 1 teaspoon dill ((fresh or dried))
  • 1/2 teaspoon cracked black pepper ((or to taste))
  • 1/4 teaspoon fine sea salt ((or to taste))

Make the fritters

  1. Combine the shredded zucchini, carrots, squash, and onion in a large mixing bowl. Sprinkle with salt, toss, and set aside for 5 minutes.

  2. When the 5 minutes is up, wrap the shredded vegetables in a clean kitchen towel and squeeze out as much of the moisture as you can. 

  3. Return the drained vegetables to the mixing bowl. 

  4. Stir in the eggs, parsley (or oregano), garlic, cumin, chili powder, and pepper. 

  5. In a small bowl, whisk together the almond flour and coconut flour.

  6. Preheat a large frying pan, then add 2 tablespoons of olive oil. 

  7. While the oil heats, scoop 3-4 tablespoon portions of fritter batter and shape into a thick disk. 

  8. Add fritters to the hot pan, being careful not to crowd them. Leave about 2″ between fritters. 

  9. Cook until the bottoms are golden brown, then flip and cook through. 

  10. Cover a plate with a paper towel, and move the cooked fritters out of the pan onto the prepared plate to drain excess oil. 

  11. Heat up 1-2 more tablespoons of oil to the pan (if necessary, use less if lots of oil is left over from the first batch), and cook the remainder of the fritters, flipping them when the bottom side turns golden brown. Move them to the lined plate to drain once they are cooked through.

  12. While the fritters are cooling and draining, make the dipping sauce.

Make the dipping sauce

  1. Mix together the yogurt and the feta cheese until well combined.

  2. Stir in the remaining ingredients. 

  3. Adjust seasonings to taste. 

Serve

  1. Serve fritters, warm, accompanied by the dipping sauce.

  • 3 1/2 cups of veggies is about two medium carrots, one medium zucchini and one medium yellow squash. Trim all the vegetables, and peel the carrots before you shred them. 
  • Recipe adapted from TheRealFoodRDs.com

The post Veggie Fritters (Gluten Free & Paleo) appeared first on A Clean Bake.

How to Freeze Broccoli: A Step-By-Step Guide to Preserving Your Extra Veggies

$
0
0

One of the easiest ways to save money and reduce food waste is to turn to your freezer! If you’re followed me for awhile, you know that I freeze nearly everything, so “making” my own frozen vegetables should be no surprise. This post will teach you how to freeze broccoli, with just a few brief steps!

The busier life gets, the easier it is to let healthy eating slip. 

I get it — trust me, I get it. It’s such a slippery of a slope, which I’ve fallen down more than I’d like to admit lately.

You didn’t have time to grocery shop, so you pick up takeout on your way home. You’re exhausted and all you want is carbs. You’re working late, so you have food delivered. Or, you wasted all your energy arguing with clients, or toddlers, or the cable guy, with no energy left for the creative maneuvering it takes to get a balanced meal on the table that no one will complain about. (Just me?)

Like I said, I so, so understand.

I keep a running tab of things I never expected to do as a parent: Eating breakfast on the floor, developing a sleep specialist for my child (I told you I understand exhaustion), and serving multiple meals at dinner. But, like everything in life, I’m learning to adapt, roll with the punches, and working ahead-slash-always having a backup plan for when things just don’t go the way you planned. 

Which, as you know all too well, is more often than not.

I really don’t mean this to turn into a therapy session. Parenting is hard! I get it! But hungry, under-nourished toddlers make things even harder, and having nourishing food nearly ready to go in your freezer makes the meantime burden that much easier. 

How to Freeze Broccoli: broccoli ready to freeze

The Benefits of Freezing Vegetables

Freezing vegetables has become a go-to kitchen hack for me. It helps cut down on my grocery bill, prevents food waste, and is extremely convenient. If you’ve never frozen fresh vegetables before, I thought I’d start with one of my favorite greens to freeze: broccoli. 

Freezing Broccoli Cuts Down on Food Waste 

First and foremost, I loathe food waste and will do whatever I can to prevent it. On a rare occasion, this results in quite the inventive dinner concoction, but in the case of freezing broccoli or other vegetables, the end result is the same product you started with. Frozen broccoli is still broccoli, and it prevents spoiled produce when you purchased too much by mistake.

Freezing Broccoli Saves Money

Eliminating food waste goes hand-in-hand with cost savings — except this time, you’ll probably buy excess produce on purpose. 

By freezing vegetables, you can buy produce year-round, particularly within peak season when veggies are at their freshest (and most affordable) point. Pick up ripe produce at the farmers’ market or grocery store, then store. Or, if you have a green thumb (which I most certainly do not), you can freeze your garden harvest for later use. 

Frozen Broccoli is Convenient 

If freezing vegetables was more work than it’s worth, I wouldn’t do it. Period. I don’t make my own almond milk or grind my own flours (although I’ve certainly tried it). But when it comes to freezing vegetables, I find it well worth the effort.

When you freeze broccoli, a wondrous thing happens: It’s in your freezer when you need it. There’s no grocery shopping. No special trips. No thoughts of, “Now where did I put that…?” It’s just there, ready to be tossed into a stir-fry, served as a side dish, or even blended into baby food puree

How to Freeze Broccoli: broccoli being rinsed

How to Freeze Broccoli: steamed broccoli

How to Freeze Broccoli

Freezing broccoli is fairly straightforward. You’ll start by preparing your produce as you normally would: Rinse a head of fresh broccoli, trim off the broccoli stems, then chop into florets.

Next, blanch your broccoli in a large pan (or pot) of boiling water. Alternatively, you can use a steamer basket. Your florets should still be bright green and firm to the touch (about half cooked). Drain the pot of water, add ice cold water to stop the cooking process, then lay your broccoli on a clean kitchen towel to try. 

Once your broccoli has cooled and dried completely, set the florets in a single layer on a baking sheet that will fit in your freezer. You’ll want to line your baking sheet with parchment paper or nonstick silicone pad, which will make sure your vegetables don’t stick to the sheet. Scatter the broccoli florets across the sheet to prevent them from touching, which will fuse them together as they freeze. 

Freeze your broccoli on the baking sheet for 4–6 hours, or until frozen. Take the baking sheet out of the freezer and transfer the frozen broccoli into a  container or plastic freezer bag labeled with the date. Store for six months. 

How to Freeze Broccoli: How to Freeze Broccoli

FAQs and Tips for Frozen Broccoli Success 

If this is your first time freezing vegetables, you might have a few questions regarding the prep and cooking process. Hopefully these few tips and tricks set you up for success:

  • What is blanching? In case you’ve never done it, blanching is the process of steaming or boiling broccoli for a short period of time, then covering them with cold water or transferring the florets into an ice bath (a large bowl filled with ice water) to immediately inhibit enzyme action – which is a fancy way of saying stopping them from cooking before they lose color, flavor, and texture. You’ll need to blanch your broccoli for roughly 3 minutes. When you’re done, the broccoli will be about half cooked. 
  • Can you freeze broccoli after it’s been fully cooked? Yes, but the result will have a different texture, and might be more watery when thawed. For best results, I always recommend freezing par-cooked vegetables.
  • Do you have to blanch all vegetables before freezing? Vegetables with high water content — including broccoli, brussels sprouts, bell peppers, and leafy greens — freeze best after being being steamed or blanched. Other vegetables, including potatoes, winter squash, and other starchy varieties, don’t need to be blanched. They can be frozen full cooked, or fully raw. Simply peel, chop, optionally cook and cool, and freeze using the same baking sheet method.
  • How long will my frozen vegetables keep? If stored properly, your frozen broccoli should keep for six months — after that, it’s susceptible to freezer burn.

How to Freeze Broccoli: How to Freeze Broccoli

Freeze Vegetables to Spare Time, Money, and Food Waste

Freezing broccoli is an easy way to cut down on cost and food waste. Fresh broccoli heads can be chopped into florets at their peak season, when they are most ripe and affordable. Or, they can be frozen when you simply grabbed too much in the produce aisle, and fear it will soon go bad.

To freeze broccoli, you simply need a large pot of water, a baking sheet, a sharp knife, and a head of fresh broccoli. After blanching, flash-freezing, and storing your broccoli in your freezer bags or containers, it will keep up to six months. Enjoy! 

How to Freeze Broccoli

How to Freeze Broccoli

Yield: About 2-3 cups of frozen broccoli florets
Prep Time: 10 minutes
Active Time: 5 minutes
Freezing Time: 12 hours
Total Time: 12 hours 15 minutes
Difficulty: Easy

This is my tried-and-true way to easily freeze broccoli. Use fresh broccoli that was picked at the peak of its season, and store in the freezer to cut down on time, money, and food waste. 

Materials

  • 1 bunch fresh broccoli

Tools

  • Cutting board and paring knife
  • Colander
  • Clean dish towel
  • 1 sauté pan or sauce pan with fitted cover
  • Baking sheet that fits in your freezer
  • Silicone pad
  • Freezer-safe airtight container

Instructions

  1. Cut the broccoli by separating the florets from the stems, and chop the florets into large, bite-sized pieces.
    How to Freeze Broccoli: chopped broccoli ready to freeze
  2. Place the florets in the colander and rinse well.
    How to Freeze Broccoli: broccoli being rinsed
  3. Put the florets into a pan with a top. Cover with water and blanch until tender but not soft. You want them to be about half cooked.
    How to Freeze Broccoli: steamed broccoli
  4. Drain excess water, then add very cold water - ideally ice water - to the pan to rapidly cool the florets and stop the cooking process. (This is the second half of the blanching process.)
  5. Spread the florets on a clean dish towel and allow to dry completely.
  6. Line a baking sheet with a silicone pad or a piece of parchment paper, and transfer the florets to the sheet. Spread them out as much as possible, so that the florets aren't touching one another.
    How to Freeze Broccoli: Broccoli ready to freeze
  7. Freeze the broccoli florets until solid, 4-6 hours or overnight.
    How to Freeze Broccoli: Broccoli going into the freezer
  8. Once solid, remove florets from the cookie sheet and transfer to a freezer-safe container or zip top bag, labeled with the date. 
    How to Freeze Broccoli: How to Freeze Broccoli
  9. Store for up to 6 months.
  10. When ready to use, cook as you would store-bought frozen broccoli.

Notes

  • I usually freeze just the florets, but you can also use the tops of the stems. The further down on the stem that you go, the tougher and more fibrous it gets, so make sure to trim liberally, or don't include the stems.

Recommended Products

As an Amazon Associate and member of other affiliate programs, I earn from qualifying purchases.


The post How to Freeze Broccoli: A Step-By-Step Guide to Preserving Your Extra Veggies appeared first on A Clean Bake.

How to Freeze Kale

$
0
0

Freezing vegetables is one of the easiest ways to reduce food waste, stretch your grocery bill, and save time. If you’re wondering how to freeze kale (or similar leafy greens like swiss chard, collard greens, or spinach), this post will teach you how, in just a few easy steps. 

Well, what a year the first two weeks of 2020 have been.

If you follow me on Instagram, you know we’ve been dealing with quite a few toddler sleep issues the past several weeks. I’ve gotten dozens of messages from the Instagram community letting me know that I am not alone. Apparently, this is really common around the age of 3. Add it to the list of things they never tell you before you become a parent! I’ve been sharing a collection of tips, tricks, and suggestions from other mothers who have (wonderfully) offered their advice, which you can view in my highlights

But for now, here’s what I have to say: I’m exhausted. Particularly in the first two weeks of the year, when you expect to be rested and rejuvenated, this has been particularly difficult. But another thing they don’t tell you about being a mom is that even when you really don’t want to be responsible, you still have to be. I have to get through the day, do my work, get dinner on the table, and not get sick. 

I’ve said it countless times before, but I live for my freezer. There’s almost nothing it can’t do to keep me sane, well-fed, and reasonably nourished during busy or otherwise stressful periods of life – as long as I do a little advance planning during those periods where I do have some time and energy to spare. 

How to freeze kale in a cupcake tin

Frozen veggies are one of my best secrets to eating healthy when you’re pressed for time, and when I have any excess kale, potatoes, broccoli, or other produce that isn’t going to get eaten before it goes bad

How to Freeze Kale 

I often get curly kale or lacinato (dinosaur) kale in my Imperfect Foods box, so that’s what I usually freeze. But technically, any bunch of kale that you buy from the farmer’s market, CSA, or grocery store can be frozen. 

If you buy too much fresh kale or you want to eat it slowly (or use it in smoothies, which is what I normally do), you can simply freeze for later use. Here’s how: 

How to Freeze Kale

Yield: Varies
Prep Time: 5 minutes
Active Time: 10 minutes
Additional Time: 2 hours
Total Time: 2 hours 15 minutes
Difficulty: Easy

Freezing vegetables is one of the easiest ways to reduce food waste, stretch your grocery bill, and save time. If you’re wondering how to freeze kale (or similar leafy greens like swiss chard, collard greens, or spinach), this post will teach you how, in just a few easy steps. 

Materials

  • 1 bunch fresh kale. Curly or lacinato varieties work best.
  • Water and ice

Tools

  • Sturdy cutting board
  • Large chef's knife
  • Saute pan or sauce pan with fitted cover
  • Colander
  • Large mixing bowl
  • Tongs
  • Clean kitchen towels
  • Greased muffin tin
  • Alternatively: Cookie sheet that fits inside your freezer and silicone pad (or parchment) that fits the cookie sheet
  • Freezer-safe Ziploc bags or containers

Instructions

  1. Remove the kale leaves from the stem. The easiest way to do this is to use your thumb and forefinger to pinch the stem firmly at the base of the leaves, then quickly slide your finger up the step the detach the leaves. The leaves should pop right off.
  2. Demonstration of an easy way to remove kale leaves from the stem
  3. Chop the kale into bite sized pieces. If you don’t like the thicker, coarse kale stems, you can certainly remove them (but there’s no harm in keeping them!). 
  4. How to freeze Kale: Chopped Kale on a cutting board
  5. Rinse the chopped leaves in a colander until no dirt or grime remains.
  6. How to freeze Kale: Chopped Kale in a colander in the sink
  7. Place your rinsed kale in a large pot or covered pan on the stovetop. Add enough water to cover the bottom of the pan and submerge the kale about ½”. Firmly close the top of the pot or pan, turn on the burner, and bring to a simmer. Steam your kale until it’s tender, but not completely soft (about 2-3 minutes). You don’t want it to wilt. 
  8. How to freeze kale: steamed kale in a large pan on the stove
  9. While your kale is cooking, prepare a large bowl ice water (about half cold water, half ice; you need plenty of ice because it will melt quickly one the hot kale is added), which is called an ice bath, and set it aside. You’ll need that in a minute.
  10. Once the kale is tender, but still bright green, drain excess water from the kale in a colander in the sink (discard the boiling water down the drain).
  11. Immediately transfer your kale to the ice water, which halts the cooking process, retaining the texture, color, and nutrients of the kale. (This type of cooking process then quickly stopping the cooking in an ice bath is called blanching.) Leave the kale leaves in the ice water for about 2 minutes, until they feel cool to the touch. 
  12. Use a pair of tongs to transfer the cooled kale leaves to a dry paper towel or kitchen towel to dry completely. If you have a salad spinner, you can pass them through it first to remove excess water, but you’ll still need to lay them out to make sure they are completely dry before you start the freezing process. 
  13. Once the leaves are dry, lightly grease or spray a muffin tin, then divide your kale into 12 portions and gently press each portion into a compartment of the muffin tin (see note for instructions on using a cookie sheet instead).
  14. How to freeze kale using a cupcake tin
  15. Freeze kale for roughly 2 hours until firm, then remove from the freezer.
  16. Transfer your frozen kale pucks from the muffin tin to a freezer-safe plastic bag or another airtight container. For best results, make sure you get as much air as possible out of the container before storing.
  17. You can use your frozen kale for up to six months. 

Notes

To freeze using a cookie sheet:

  • Line a cookie sheet with parchment or a silicone pad, and lay your kale leaves in a single layer on the prepared sheet.
  • Make sure the cookie sheet fits in your freezer!
  • If you don’t have a cookie sheet that fits inside your freezer, you may need to freeze your kale in a couple of batches on dinner plates or another smaller flat surface.

Recommended Products

As an Amazon Associate and member of other affiliate programs, I earn from qualifying purchases.

FAQs: Tips for Frozen Kale Success 

  • Can you freeze raw kale without blanching? Technically yes, but I don’t recommend it. If you freeze kale without blanching, plan to use it in less than 1-2 months. 
  • Do you have to wash kale before freezing: Absolutely. It is much easier to remove dirt from fresh kale than frozen kale, so you might as well do the work upfront.  
  • How long can you keep kale in the freezer? You can keep it in the freezer for about 12 months.
  • How do you defrost frozen kale? To defrost frozen greens, simply take the Ziploc bag they’re stored in out of the freezer and place it on the counter or in a bowl of cool water. No need to take the kale out of the bag to defrost. However, in some recipes you can keep the kale frozen, such as in kale smoothies.
  • What recipes can I use with frozen kale? Hmm…where do I start? You can use frozen kale to make a puree, pesto, stir-fry, or even saag paneer. Just remember, the frozen kale will retain some moisture even after it’s thawed out, so it won’t be crispy like raw kale. Therefore, it won’t work well in kale salads or baked as kale chips

Kale leaves: how to freeze kale

Frozen Kale Recipes

Here are a few ways to use your frozen kale: 

  • Creamy Vegan Kale Pesto: Admittedly, fresh greens are always best for pesto. But if you’re really in a pinch, you could use defrosted frozen kale for pesto. 
  • High Protein Strawberry Banana Smoothie: Virtually any green smoothie will work with frozen kale. This recipe combines yogurt, coconut milk, strawberries, bananas, and kale into each bite. 
  • Gluten-Free Breakfast Casserole with Homemade Sausage: Freezing kale comes in handy down the line when you’re throwing together casseroles like this one. Defrost and thoroughly drain the excess liquid from the kale before you use it in the casserole, or else your casserole will come out soupy. This veggie quiche is another recipe that may work well in your household. 

Freeze Kale to Put Time Back in Your Week 

Freezing leafy greens — whether they be kale, spinach, or collard greens — save you time, money, and energy. Plus, it helps cut down on food waste (which is my personal mission in the kitchen). 

Any raw kale can be frozen. So the next time you purchase too much at the store, don’t let it go to waste. Simply wash, chop, blanch, then flash-freeze your kale to enjoy at a later date. Frozen kale will keep up to one year, and can be used in a number of recipes.


The post How to Freeze Kale appeared first on A Clean Bake.

Acorn Squash Galette with Caramelized Onions and Thyme (Gluten Free and Paleo)

$
0
0

Paleo-Acorn-Squash-Galette-With-Caramelized-Onions-And-Thyme

Look! I got my act together and made us a Thanksgiving recipe! Granted, it’s another side dish, but who doesn’t need another side dish idea the upcoming week for when you realize [insert way that things didn’t go to plan this week, as it never does for anyone every year]. No worries. I totally have you covered with this acorn squash galette. It tastes so fancy! But only takes a little while to make! Rustic imperfection is part of its charm! And you get the help of appliances to make it!

Paleo-Acorn-Squash-Galette-With-Caramelized-Onions-And-Thyme

Paleo-Acorn-Squash-Galette-With-Caramelized-Onions-And-Thyme

First, make the caramelized onions. But make them in your slow cooker, so you can go do other things while they’re caramelizing and you don’t have to wait around watching the oven. Also, make them in advance, since you can make a big batch and keep them in the fridge for awhile (up to 2 weeks, in my experience) or in the freezer for even longer (up to 2-3 months in an airtight container). So, that’s done.

Next, make the filling by roasting or steaming a small, peeled, seeded and sliced acorn squash (you can use butternut if you prefer; in order to quickly cook it, I peeled, seeded and sliced the squash and then quick-steamed it in a covered pan until soft) and toss it with the caramelized onions and seasonings.

Finally, make the crust. All you have to do – and I mean this completely literally – is throw the ingredients, first dry, then wet, in a food processor and mix until a ball of dough forms.

To assemble the galette, gather the dough in a ball, sandwich it between two pieces of wax or parchment paper and roll (or press) into a disc. Pour the filling into the center and fold the edges over to seal it all in (if you have any issues with the dough cracking, just wet your fingers and re-hydrate that part of the dough until you can seal the crack back together). Then brush with egg wash – which is an optional step, but helps with browning – and bake.

Paleo-Acorn-Squash-Galette-With-Caramelized-Onions-And-Thyme

I think it took me longer to type out the process than it did to actually carry it out. In case you don’t believe me that it really is that easy, you can see step-by-step pictures in this post. Or, better yet, you could try it for yourself and report back to me on how surprisingly low maintenance this savory acorn squash galette is to make, and how much credit you got to take for slaving away in the kitchen for “hours” leading up the Thanksgiving dinner. 😉

Paleo-Acorn-Squash-Galette-With-Caramelized-Onions-And-Thyme

Acorn Squash Galette with Caramelized Onions and Thyme

Yield: 8 slices
Prep Time: 35 minutes
Cook Time: 40 minutes
Total Time: 1 hour 15 minutes

This acorn squash galette with caramelized onions and thyme crust is a crowd pleasing side dish for a dinner party of holiday that is so easy to make!

Ingredients

Ingredients for the filling

  • 1 small acorn squash, about 2/3 lb, steamed or roasted, peeled, seeded and sliced, and cooked until tender
  • 1/2 cup caramelized onions
  • 1 Tablespoon fresh thyme leaves
  • 1/4 teaspoon fine sea salt
  • 1/4 teaspoon freshly ground black pepper

Ingredients for the crust

  • 1 1/2 cups blanched almond flour
  • 1/4 cup + 2 Tablespoons coconut flour
  • 2 Tablespoons fresh thyme leaves, loosely packed
  • pinch salt
  • 1/4 cup very cold butter, sub coconut oil, melted and cooled, for dairy free option, chopped into chunks
  • 2 Tablespoons very cold water or milk of choice
  • 1 large egg white, about 2 Tablespoons

Ingredients for finishing

  • 1 large egg, beaten
  • 1 Tablespoon milk of choice

Instructions

  1. Preheat the oven to 350F. Get out a baking sheet that is large enough to hold a piece of parchment, and set aside.
  2. Make the filling: In a large mixing bowl, gently fold together all of the filling ingredients until thoroughly combined. Set aside while you make the crust dough.
  3. Make the crust: In the bowl of a food processor fitted with the "s" blade, pulse the almond flour, coconut flour, thyme, salt and pepper together several times to combine. 
  4. Add the butter (or coconut oil), and pulse several times until the butter pieces (if using) are the size of small peas. While the machine is on, pour in the milk and egg white and continue to process until the dough comes together in a large ball or mass.
  5. Scrape down the sides of the food processor bowl to make sure all of the dough is incorporated, and then turn out the dough ball onto a large sheet of parchment paper.
  6. Top with another sheet of parchment, and roll into a disc about 1/4" thick. Make sure the disc fits within the width of parchment and the parchment fits on your baking sheet. If you need to make the dough disc a little thicker to make sure it fits, do so.
  7. Grasp the parchment firmly on both sides and, applying enough tension to keep the parchment paper as flat as possible, transfer the dough disc (with the parchment) onto the waiting baking sheet.
  8. Add the filling to the center of the crust, leaving about 2" empty.
  9. Pick up one corner of the parchment and use it to fold the empty dough over the peaches. Then rotate a few inches and do the same again, folding the crust over the peaches (overlapping the first fold slightly). 
  10. Continue to repeat this motion until the entire filling has been encased in the extra border of dough.
  11. Make the egg wash by whisking together the egg and milk. Brush the top and side of the galette dough (all exposed dough, NOT the filling), with egg wash.
  12. Bake for 30-40 minutes until the crust is firm and golden.
  13. Allow to cool on the baking sheet for at least 10 minutes before serving.

Notes

  • You can replace the acorn squash with butternut if you prefer.
  • In order to quickly cook the squash, peel, seed and slice it, then put the slices in a pan with about 1/2" of water, cover it, and cook, stirring occasionally, until softened.
  • Tip for folding the dough: Using the parchment to fold helps minimize cracks but if your dough still cracks, just use your fingertips to gently smooth and reseal the crack. If that isn't working well, dip your finger in a small bowl of water before smoothing over the cracks. This will rehydrate the dough and allow it to form a seal again.
  • This galette is best within a few hours of baking, but if you have leftovers, store them in an airtight container in the fridge for up to 3 days. Expect the crust to soften and get a little cake-ier with each day in the fridge.
  • Yield: One galette/approx 6-8 slices
Nutrition Information:
Yield: 8
Amount Per Serving: Calories: 205Saturated Fat: 5gCholesterol: 38mgSodium: 150mgCarbohydrates: 8gFiber: 4gSugar: 1gProtein: 6g

Did you make this recipe?

Please leave me a comment below, or share a photo on Instagram and let me know what you think!

[wprm-nutrition-label align=”center”]


Paleo-Acorn-Squash-Galette-With-Caramelized-Onions-And-Thyme

The post Acorn Squash Galette with Caramelized Onions and Thyme (Gluten Free and Paleo) appeared first on A Clean Bake.

Simple Grapefruit & Avocado Salad (Gluten Free, Paleo, and Whole30)

$
0
0

A grapefruit & avocado salad is as low maintenance as it sounds. Just toss together fresh, tangy grapefruit with rich, perfectly ripe avocado, fresh parsley, and a light, 3-ingredient dressing for a satisfying and flavorful side!

Grapefruit Avocado Salad (Gluten free, paleo, vegan)

With a name that leaves little mystery about what to expect when the first forkful reaches one’s tongue, one can be forgiven for assuming this dish is … blah. Ordinary. Boring. Un-luxurious.

One would be wrong.

Imagine this: Juicy bursts of tart grapefruit mingled with rich, silky, melt-in-your-mouth chunks of perfectly ripe – no, maybe slightly overripe for just a degree more softness – avocado, tangy salt and crisp lime juice. If any salad were too dazzling to be a mere side dish, a humble supporting character, this is that salad. This salad steals every scene it is cast in.

Grapefruit Avocado Salad (Gluten free, paleo, vegan)

The stars are, of course, members of the tragically underrepresented – at least not here on this site – winter produce family, which I decided was due, no overdue, for its close up. So, with that, I humbly present this simple-slash-addictive salad that we periodically eat by the bucketful (I’m only slightly kidding).

It’s so simple to put together that it can only barely be called a recipe, if we’re honest. The portions should be considered an estimate; this is how I like mine but this is most certainly one of those easygoing dishes that allow you a lot of leeway to adjust to what you have on hand, or what you like, or what mood you’re in. Serve it with your protein of choice, simply seasoned and quickly cooked, and you have a meal.

Grapefruit Avocado Salad (Gluten free, paleo, vegan)


Instead of trying to find the words to ramble on about a recipe about which the name leaves little to the imagination – yet reveals absolutely nothing about the experience of eating the dish – I’ll just offer up the recipe itself and let you get to the store now (while grapefruit is on sale and avocado is inexpensive enough that you don’t need to remortgage your house to buy more than two). Let’s take advantage of winter produce!

Grapefruit Avocado Salad (Gluten free, paleo, vegan)

Grapefruit & Avocado Salad

Yield: 8 small servings
Prep Time: 10 minutes
Total Time: 10 minutes

A grapefruit & avocado salad is as low maintenance as it sounds. Just toss together fresh, tangy grapefruit with rich, perfectly ripe avocado, fresh parsley, and a light, 3-ingredient dressing for a satisfying and flavorful side!

Ingredients

  • 3-4 medium grapefruit
  • 2 large ripe avocados
  • 1 cup flatleaf parsley or cilantro,, measured gently packed
  • 1 whole lime, (juice only)
  • 2 tablespoons olive oil
  • Pinch coarse salt, to taste

Instructions

  1. Peel the grapefruit and slice into wedges or bite-sized chunks. Transfer to a large mixing bowl and set aside.
  2. Remove and discard the peel and pit of the avocado. Cut the flesh into slices or bite sized cubes and add to the mixing bowl with the grapefruit.
  3. Roughly chop the parsley or cilantro and add to the grapefruit and avocado. Gently toss to combine the three ingredients.
  4. In a small mixing bowl, whisk together the lime juice and olive oil. Pour over the grapefruit - avocado mixture and fold gently to coat.
  5. Add salt to taste.
  6. Serve immediately.

Notes

  • Store leftovers in an airtight container in the fridge for up to 3 days. This salad is best eaten within 24 hours, though.
  • This recipe will yield 4 larger or 8 smaller servings. 
Nutrition Information:
Yield: 8
Amount Per Serving: Calories: 34Sodium: 4mg

Did you make this recipe?

Please leave me a comment below, or share a photo on Instagram and let me know what you think!

[wprm-nutrition-label align=”center”]

Grapefruit Avocado Salad (Gluten free, paleo, vegan)


The post Simple Grapefruit & Avocado Salad (Gluten Free, Paleo, and Whole30) appeared first on A Clean Bake.

Spinach Chips with Sea Salt and Lime (Gluten Free, Paleo, Vegan, and Whole30)

$
0
0

These healthy spinach chips have an addictive salty-citrusy flavor that you’ll love!

Homemade Sea Salt Lime Spinach Chips (Vegan, Gluten-Free, Grain-Free, Paleo)

Wait, don’t go. It’s not as weird/gross/crunchy as it sounds. Actually, spinach chips are crunchy, but crispy-crunchy, not granola-birkenstock-commune crunchy. They’re completely addictive.

Of all the healthy recipes I’ve posted here, it is always the ones that received the least planning, the least foresight, and were the most impulsive additions to the site that end up being the most popular (ahem.. looking at you, Ratatouille…). This is no exception. 

Making Spinach Chips is a Simple Process

First of all: no frying! Spinach chips is basically a fancy way of saying baked spinach leaves. You will toss large fresh spinach leaves (don’t use baby spinach; it’s too fragile) in a large bowl with extra virgin olive oil, lime juice, and fine sea salt, and spread them in a single layer on a baking sheet. Pro tip: don’t forget to cover your baking sheet with parchment paper so the delicate, crisp little chips don’t stick to the baking sheet and break when you try to remove them.

For a little extra kick, add chili powder or paprika to your spinach chips, or swap the lime for garlic powder. But that’s really all the heavy lifting you’ll have to do. Prep time takes maybe 5 minutes, and the cook time is a little longer (around a half hour), but it’s hands off time in which you can spend doing something else.

Consider these oven baked spinach chips to be the healthier, homemade version of those tortilla chips we all know, love, and have eaten our body weight in over the course of our lives. You know what I’m talking about. No more, though. Tostitos are out. Heck, potato chips are out! And, for that matter, consider baked kale chips out too. Kale may be on trend, but spinach is forever.

These spinach chips will not last forever, though.

Like any good chip, these are salty and flavorful and so satisfyingly crunchy that the whole batch will be inhaled before you know it. And who doesn’t love to eat their veggies in chip form?

They are a healthy snack that is delicate and not at all filling, though, so you won’t feel, you know, terrible when you do. Trust me. I’ve tested this theory just for you. Pro tip: it’s probably best to double the recipe right out of the gate. You’ll thank me later.


Homemade Sea Salt and Lime Spinach Chips (Vegan, Gluten-Free, Grain-Free, Paleo)

Sea Salt and Lime Spinach Chips

Yield: 4 people
Prep Time: 10 minutes
Cook Time: 35 minutes
Total Time: 45 minutes

Sea Salt Lime Spinach Chips - gluten-free, vegan, grain-free, & paleo. These healthy homemade chips have an addictive salty-citrusy flavor that you'll love!

Ingredients

  • Zest and juice of one large lime, (about 1 1/2 Tablespoons zest + 2 tsp juice), divided
  • 1/2 teaspoon fine sea salt
  • 8 packed cups fresh whole spinach leaves, (do not use baby spinach), rinsed and dried
  • 2 Tablespoons extra virgin olive oil

Instructions

  1. Preheat the oven to 275F. Line 2 baking sheets with nonstick pads or parchment paper.
  2. In a small bowl, use your fingers to rub together the zest and the salt.
  3. In a large mixing bowl, toss the spinach with the olive oil to thoroughly coat. 
  4. Then add the lime salt and toss again to distribute a little bit of the salt on each leaf. Use your hands if necessary.
  5. Distribute the spinach between the two prepared cookie sheets in an even layer (do not crowd the leaves). 
  6. Sprinkle each batch with a teaspoon of lime juice.
  7. Bake for 30-35 minutes (you may need less time depending on how fresh your spinach is, so keep an eye on it) until the leaves are withered and very thin.
  8. Remove from oven, and let the chips cool completely on the pan before serving.

Notes

  • It is best to eat these chips as soon as they've cooled. If you need to store them, the best way is in an open container in the fridge. If you cover them, they'll get soggy though. Even uncovered, they will lose some of their crispness overnight.
Nutrition Information:
Yield: 4
Amount Per Serving: Calories: 62Sodium: 292mg

Did you make this recipe?

Please leave me a comment below, or share a photo on Instagram and let me know what you think!

[wprm-nutrition-label align=”center”]

This post contains affiliate links, which means that if you click through and purchase a product, A Clean Bake receives a small commission. All proceeds go toward continuing to bring you delicious, healthy recipes every week, and this does not affect the price you pay. Thanks for supporting A Clean Bake!

The post Spinach Chips with Sea Salt and Lime (Gluten Free, Paleo, Vegan, and Whole30) appeared first on A Clean Bake.

Easy Marinated Onions with Sumac

$
0
0

Easy Marinated Onions with sumac will be your secret weapon for elevating any dish. Try them on salads, sandwiches, burgers and more!

Easy Marinated Onions with Sumac (gluten free, paleo, vegan, low carb)

While, on the surface, a post called “easy marinated onions” may seem like filler content for a week when I have run out of ideas, let me be the first to assure you that this isn’t a phoned in recipe. In fact, this may be the recipe that elevates your summer to The Summer of Awesome Meals.

Here’s how you do it:

Prepare your meal. Add these easy marinated onions. Meal Immediately Becomes Awesome.

Here: let’s run an experiment. What are you having tonight?

  • Burgers? Top with marinated onions.
  • A sandwich? Layer on marinated onions.
  • Salads? Oh, this is too easy.
  • Tacos? Eggs? You get the gist.

Even soup – no kidding – tastes wonderful with these marinated onions. Despite it being 90 degrees outside, we had the quickest cream of tomato soup (our go-to meal around here) for dinner on Sunday night, and garnished it with – surprise, surprise – marinated onions.

Easy Marinated Onions with Sumac (gluten free, paleo, vegan, low carb)

Ask me why I’m a maniac about these random, overly simple food. Go ahead.

Glad you asked!

Onions are a tricky ingredient. While, on the one hand, they impart essential flavor and are also, incidentally, an excellent prebiotic food (meaning they feed the probiotics, or good bacteria, in your gut that are so essential to good health and digestion), they are, on the other, really, really stank-ay, tainting your breath for far longer than seems reasonable. Not cute. Also, if you have IBS or an otherwise finicky digestive system, they can be irritating.

But when you marinate them in oil and acid, all that changes. Their harsh flavor and odor mellows and the little slices become soft and pliable – all the better for flopping a forkful on whatever you’re eating and, anecdotally speaking, digesting without any trouble. (Well, keep in mind that my sample size for this finding is one, so if you are terribly intolerant to onions, just avoid these.)


Easy Marinated Onions with Sumac (gluten free, paleo, vegan, low carb)

Since you’re smart enough to take it from here, I’ll leave you with the recipe so that you can get to marinating and start topping everrrrrything with these onions!

Easy Marinated Onions with Sumac (gluten free, paleo, vegan, low carb)

Sumac Marinated Onions

Yield: 8 servings
Prep Time: 5 minutes
Total Time: 5 minutes

Easy Marinated Onions with sumac will be your secret weapon for elevating any dish. Try them on salads, sandwiches, burgers and more!

Ingredients

  • ½ red onion,, thinly sliced
  • 6 Tablespoons extra virgin olive oil
  • ¼ cup white balsamic vinegar
  • ½ - 1 teaspoon sumac, (to taste)
  • 1/8 teaspoon salt

Instructions

  1. Add the sliced onion to a medium jar or airtight container. 
  2. Add the rest of the ingredients to the container. Seal and shake vigorously for 10 seconds. 
  3. Taste, adjust ingredients to your preference. Reseal the jar and allow to marinate at least 10 minutes, and up to 48 hours.

Notes

  • Multiply the recipe as necessary
  • Store leftovers in an airtight container in the fridge for up to a week.
  • One you finish the onions, you can add more sliced raw white or red onions to the marinade and reuse it once or twice!
  • Makes about 1/2 a cup; 1 Tbsp is assumed serving size
Nutrition Information:
Yield: 8 Serving Size: g
Amount Per Serving: Calories: 102Saturated Fat: 1gSodium: 38mgCarbohydrates: 2gSugar: 1g

Did you make this recipe?

Please leave me a comment below, or share a photo on Instagram and let me know what you think!

[amazon_link asins=’B00PDR8MRS,B000JSQ282,B00OV7O5BS,B009NT3JD4,B00LB69GK2′ template=’ProductCarousel’ store=’butterfanati’ marketplace=’US’ link_id=’686eb014-65e5-11e7-9407-3fd4f113db52′]

[wprm-nutrition-label align=”center”]

Easy Marinated Onions with Sumac (gluten free, paleo, vegan, low carb)

Note: This recipe was part of a chicken kebab dish I made for Simple Mills. Check it out here!

This post contains affiliate links, which means that if you click through and purchase a product, A Clean Bake receives a small commission. All proceeds go toward continuing to bring you delicious, healthy recipes every week, and this does not affect the price you pay. Thanks for supporting A Clean Bake!

The post Easy Marinated Onions with Sumac appeared first on A Clean Bake.


Ratatouille

$
0
0

This Ratatouille recipe comes together quickly for a fresh weeknight dinner. It’s a light & fresh dish that’s gluten free, vegan, and paleo. Plus, it freezes well – so go ahead and make a double batch! (Vegan, Vegetarian, Gluten Free, Paleo, and Whole30 Compliant)

This Ratatouille recipe comes together quickly for a fresh weeknight dinner. It's a light & fresh dish that's gluten free, vegan, and paleo. Plus, it freezes well - so go ahead and make a double batch! 

Granted, this might be the yuppiest thought to have ever been uttered, tied only with “OMG! They’re out of pumpkin spice lattes!” and “Ugh my premium high speed internet is totally only running at the speed of standard” but can I just ask what the heck we did before CSAs?

All over the country, small farmers are pulling insanely fresh, plump vegetables out of the ground and off of vines or trees or… wherever one finds vegetables ????‍♀ (See, this is why I leave the farming to the farmers).


Anyway, I only mention it because a CSA means you not only get to support these fabulous farmers, but receive, in return, a weekly box full of said freshly picked veggies (and, in some CSAs, fruits too), and do incredible-slash-incredibly-simple things with them, like make Ratatouille.

Every week, I open my box with big eyes and a hopeful stomach, hoping for another round of the crisp zucchini and juicy cucumbers that were in last week’s box.

This Ratatouille recipe comes together quickly for a fresh weeknight dinner. It's a light & fresh dish that's gluten free, vegan, and paleo. Plus, it freezes well - so go ahead and make a double batch! 

It seems like my CSA’s cucumber stock has been exhausted (damn. But don’t think I am not still making fridge pickles.), but they’ve wisely softened the blow by replacing them with plump tomatoes and long, smooth Japanese eggplants. Those, combined with the extra onions that went unused from this recipe, just screamed MAKE ME INTO RATATOUILLE!

What the heck is ratatouille?

It’s not not the fancy, complicated dish that the name sounds like. Oh, and it’s not a cartoon mouse either, as it is probably primarily known in the United States. (As someone who, as a rule, detests cartoons, the degree to which I adore that cartoon mouse is somewhat alarming. But that’s for another post. But seriously, how could you not love that face?).

It’s a simple and casual dish that originated in France, probably as peasant food. The heart of the dish is stewed summer vegetables, with very little else, so the flavors of the peak-season vegetables shine through.

This Ratatouille recipe comes together quickly for a fresh weeknight dinner. It's a light & fresh dish that's gluten free, vegan, and paleo. Plus, it freezes well - so go ahead and make a double batch! 

I’ve seen this dish in several forms

from the probably-original rustic peasant stew in which the veggies are roughly chopped and simmered or baked in a thick tomato-based sauce, to an overly fancy and (if you ask me) time consuming swirl, culminating in a flourish of some kind of flower pattern in the center.

Who has time for that??

Not me. The easiest way to do it, in my opinion, is to quickly stir the sauce together and pour it into the bottom of the pan (you could even mix it in the pan if you wanted to) before layering the veggies on top.

I like to slice the veggies up separately and then create an assembly line so you can grab them in order, shove them into the pan and then grab another set. That’s the easiest way to get this dish to look like you spent all day on it, but we’re really only talking about an extra 2-3 minutes of effort.

Don’t worry about perfection here. If you look closely at my version, you’ll notice that the pattern is spotty at best, betraying my limited attention span while I was putting this together (no matter how many times you watch Gilmore Girls through, it is always SO good, amiright?). But look, if you came to this site for perfection, you might be sorely disappointed. We do our best, but I’d rather have stellar flavor and an imperfect veggie pattern any day.

This Ratatouille recipe comes together quickly for a fresh weeknight dinner. It's a light & fresh dish that's gluten free, vegan, and paleo. Plus, it freezes well - so go ahead and make a double batch! 

And, boy, does the flavor deliver on this. Great quality fresh vegetables have a beautiful flavor on their own, and I also used super high quality crushed tomatoes (in this case, they were also from my CSA, but you can get good quality canned tomatoes at the store. Try San Marzanos, if you can find them. It’s worth the investment).

So, the dish didn’t need much help, but I added a couple of flavor enhancements – fresh garlic and basil, and a spice mix called Herbs de Provence – just to take it over the top. Please don’t hate me for requiring you to buy a new spice for this dish. It is 100% worth it, and you can sprinkle it on chicken and potatoes for a quick, one pan weeknight dinner (or use it for these recipes). If you really don’t want to purchase Herbs de Provence, you an replace with 1/4 teaspoon each of dried or fresh rosemary, oregano and thyme.

But wait, we haven’t finished discussing THIS quick one-pan weeknight dinner. It’s super healthy, quick and filling, and all you need to make it a meal is your favorite protein. I picked up a rotisserie chicken to accompany this, and then subsequently ate the leftovers cold with a runny egg on top for breakfast. But it can just as easily make for a wonderful addition to a dinner party menu.

And the leftovers! Oh my goodness. After a day or two in the fridge, the flavors mature and meld and I’m not committing to anything here, but there is a chance the leftovers might be better than the freshly made dish. So, all I’m saying is you should probably double the recipe…just to be safe.

Before you start cooking, here are a few more tips to make sure you get the most out of this recipe!

Believe it or not, this Ratatouille recipe is the most popular recipe on this site! Why? Well, it has it all! It’s easy, healthy, and free of just about every allergen (except nightshades…sorry. Can’t win ’em all!). You can make it again and again, and so many readers have. Here are some of the tips and answers to questions that readers have found most helpful:

  • The vegetables, including the crushed tomatoes, take center stage in this dish and there is relatively little in the ingredient list to season them, so flavor is very important. Try to get the absolute best quality vegetables you can. It really is worth the splurge, and will take this dish from good to great.
  • If you can’t get Japanese eggplant, you can use Italian eggplant (the fat, inky purple eggplant you commonly see in supermarkets). Try to cut it so that it is roughly the same size as the onions and tomatoes, even if that means cutting each slice into halves or quarters. That way, all of the vegetables will cook evenly.
  • If you must replace some of the vegetables, try to go with similarly summery vegetables with a high water content (again, for even cooking). Try things like a bell pepper or yellow squash instead of zucchini, shallots instead of onions, or – like I mentioned above – Italian eggplant in place of Japanese eggplant.
  • Some people have cautioned that Herbs de Provence contains a little bit of Lavender, so if you are especially sensitive to that flavor, replace the herbs de Provence with a heaping 1/4 teaspoon each: dried or fresh rosemary, oregano and thyme.
  • Here are a few other recipes to help use up those Herbs de Provence.
  • This may seem like a lot but is really enough for 2-3 people. If you’re feeding a family or a crowd, double the recipe and bake it in a 9″x12″ pan.
  • Optionally, you can finish the dish by drizzling it with a little bit of good quality olive oil.
  • As written, this recipe is gluten free, vegetarian, vegan, paleo friendly, low carb and Whole30 compliant.
  • To make it heartier, you can add vegan or dairy cheese on top, and/or serve over quinoa, mashed sweet or white potatoes, rice, or your grain of choice.
  • Store leftovers in an airtight container in the refrigerator for up to 3 days.
  • Or, if you’d like to make this ahead for a future dinner, cool it completely and transfer it to an airtight container. It will keep in the freezer for up to three months. To prepare, bring to room temperature (just leave it in the fridge for a day or two) and then microwave until heated through.

One last thing: French readers will say this is not, in fact, ratatouille. It’s Tian! I know, I’m perpetuating Ratatouille lies a little bit.

Traditional Ratatouille is actually more of a stew of chopped vegetables (including green or red bell pepper, which I am not including here), all of which are cooked in a dutch oven. It’s a slightly less fussy dish.

Tian, the version that presents the vegetables neatly sliced in rows or a spiral, is more of a looker (and more fun to photograph, if I’m being honest) – but in America, is generally (though, admittedly, mistakenly) known as Ratatouille. So, now that I’ve thoroughly insulted French culinary tradition and confused you all, let’s get cooking! ????

Ratatouille

Ratatouille

Yield: 4 servings
Prep Time: 20 minutes
Cook Time: 1 hour
Total Time: 1 hour 20 minutes

This Ratatouille recipe comes together quickly for a fresh weeknight dinner. Plus, it's suitable for gluten free, paleo and vegan diets!

Ingredients

  • 1 cup crushed tomatoes
  • 1 Tablespoon extra virgin olive oil
  • 1/4 teaspoon apple cider vinegar
  • 1 teaspoon minced garlic
  • 1 Tablespoon fresh basil, about 3-4 large leaves, sliced , plus more for garnish
  • 1 teaspoon herbs de Provence spice mix
  • 1/4 teaspoon salt
  • 1/4 teaspoon black pepper
  • 1/4 teaspoon chili powder
  • 1 medium sweet or red onion,, sliced
  • 1-2 large zucchini, (about 1 1/2 cups slices, sliced)
  • 1 large Japanese eggplant, (about 3 cups slices, sliced)
  • 3 large fresh tomatoes, (roma is best; about 3 cups slices, sliced)

Instructions

  1. Preheat oven to 350F. Lightly grease a 6"x9" baking dish and set aside. (see notes for baking in an 8"x8" square pan)
  2. In a medium mixing bowl, combine the crushed tomatoes, oil and vinegar. Stir in the garlic, basil, herbs de Provence, salt, pepper, and chili powder.
  3. Pour the tomato mixture into the prepared baking dish and smooth it into an even layer on the bottom of the pan.
  4. Stack the veggie slices in alternating patters (e.g.: onion, zucchini, eggplant, tomato; repeat) and place them on their side in the pan, leaning against the edge of the pan. Repeat until you've formed a couple of rows of veggies, filled the pan, and used up all of the veggie slices.
  5. Optionally, spray or brush the exposed tops of the veggies with oil to encourage browning in the oven. This is more for appearance, so feel free to skip this step if you want.
  6. Bake for about an hour, until the tomato sauce at the bottom is bubbling and the veggies are tender.
  7. Garnish with additional chopped fresh basil before serving (optional). Serve hot or cold.

Notes

  • If you'd like to bake this in an 8" x 8" square pan, you can. The bake time is about the same. 
  • The vegetables, including the crushed tomatoes, take center stage in this dish and there is relatively little in the ingredient list to season them, so flavor is very important. Try to get the absolute best quality vegetables you can. It really is worth the splurge, and will take this dish from good to great.
  • If you can't get Japanese eggplant, you can use Italian eggplant (the fat, inky purple eggplant you commonly see in supermarkets). Try to cut it so that it is roughly the same size as the onions and tomatoes, even if that means cutting each slice into halves or quarters. That way, all of the vegetables will cook evenly. 
  • If you must replace some of the vegetables, try to go with similarly summery vegetables with a high water content (again, for even cooking). Try things like a bell pepper or yellow squash instead of zucchini, shallots instead of onions, or - like I mentioned above - Italian eggplant in place of Japanese eggplant.
  • Some people have cautioned that Herbs de Provence contains a little bit of Lavender, so if you are especially sensitive to that flavor, replace the herbs de Provence with a heaping 1/4 teaspoon each: dried or fresh rosemary, oregano and thyme.
  • Here are a few other recipes to help use up those Herbs de Provence.
  • This may seem like a lot but is really enough for 2-3 people. If you're feeding a family or a crowd, double the recipe and bake it in a 9"x12" pan.
  • Optionally, you can finish the dish by drizzling it with a little bit of good quality olive oil.
  • As written, this recipe is gluten free, vegetarian, vegan, paleo friendly, low carb and Whole30 compliant.
  • To make it heartier, you can add vegan or dairy cheese on top, and/or serve over quinoa, mashed sweet or white potatoes, rice, or your grain of choice.
  • Store leftovers in an airtight container in the refrigerator for up to 3 days.
  • Or, if you'd like to make this ahead for a future dinner, cool it completely and transfer it to an airtight container. It will keep in the freezer for up to three months. To prepare, bring to room temperature (just leave it in the fridge for a day or two) and then microwave until heated through.
Nutrition Information:
Yield: 4 Serving Size: g
Amount Per Serving: Calories: 109Sodium: 241mgCarbohydrates: 17gFiber: 4gSugar: 11gProtein: 3g

Did you make this recipe?

Please leave me a comment below, or share a photo on Instagram and let me know what you think!

Pin This for Later:

Ratatouille is an easy dinner or side dish that is so healthy and delicious! It's naturally gluten free, vegan, paleo, low carb, and Whole30 compliant. ##glutenfree #glutenfreerecipe #Paleo #Paleorecipe #healthy #healthyrecipe #easy #easyrecipe #realfood #lowcarb #lowcarbrecipe #healthyrecipes #healthydinner #easyrecipes #easydinner #glutenfreedinner #vegandinner #paleodinner

Ratatouille #glutenfree #glutenfreerecipe #paleo #paleorecipes #vegan #veganrecipes #whole30 #whole30recipes #easydinner #easydinnerrecipes #healthydinner #healthydinnerrecipes #onepanrecipe #onepandinner #paleorecipe #veganrecipe #healthyrecipe #whole30recipe #lowcarbrecipe

The post Ratatouille appeared first on A Clean Bake.

Perfect Roasted Beets (Or, How To Make Beets That Don’t Suck)

$
0
0

If you learn my simple trick for how to roast beets, you’ll never look at those funny root vegetables the same way again. Properly roasted beets are a far cry from those soggy tasteless pink slabs that come in a can. Roasted beets are sweet, rich, tender, and an incredible addition to salads – or great on their own! They’re naturally gluten free, paleo and vegan.

How to Roast Beets (To Make Delicious Roasted Beets!) #glutenfree #paleo #vegan #lowcarb #healthy

I’m updating some of my old content, and in doing so, was reminded of this old recipe with, well, let’s just say the photos didn’t do it justice. If you think you’re a beet hater, or you’ve only had beets from a (*gag*) can, or maybe you’ve never bothered to try a beet, I’m here to change your mind.

Give Beets A Chance!

Like many ugly root vegetables (I see you there, turnips), beets get a bad name. It’s a tragedy because, inside their rough, root-y, wire-y, knotty exterior, beets hide a tender meet whose sugars caramelize into something wonderful in the oven. Nature’s candy, you might say.

Then again, you might not. Because everyone knows raisins are nature’s candy.

Learn how to Roast Beets - The delicious way! (#glutenfree, #vegan, #paleo, #lowcarb, and #whole30)

Roasted Beets Are Not The Same Species As Any Other Cooked Beets

The trick to not detesting beets is to avoid eating them in any form that fails to do them justice. So basically, skip them raw, steamed, and especially – ESPECIALLY. I really can’t stress this enough – not canned.

Really, all that leaves is roasting, which is, luckily, the best way to eat a beet. I’m going to share my go-to roasted beets recipe with you. Buckle up.

How to make roast beets – the right way

The secret to perfect roasted beets is this: 350°.

Everyone who I mention this to looks at me funny. Doesn’t roasting mean 400° or higher? Possibly, depending on who you ask.

Most people think of roasting and assume it must be done in a very hot oven, but it primarily means dry heat cooking of something that already has a shape – as opposed to baking in which the cooking process gives the food shape. Think roasting beets, or a whole chicken (solid –> solid) vs. baking a cake (liquid –> solid).

In the case of beets, and other root veggies and high-starch produce like squash, a low-ish and slow cooking process effectively removes enough of the moisture to allow the flavors to deepen, the sugars to condense and caramelize, and the flesh to become tender. If the temperature were higher, the beets would burn before they reached peak shrivel-y sweet-and-tenderness.

By the way, you can use this same method for roasted sweet potatoes.

How To Make Delicious Roasted Beets #glutenfree #paleo #vegan #lowcarb #healthy

How To Prep Your Beets

You an use small or large beets – the size doesn’t matter since you’re going to slice (or chop) them. 

Prep the beets while you preheat the oven.

First clean your beets. You can peel them if you want. Just use a vegetable peeler like you’d use on a carrot, and go slowly – the curves and knots on beets can make your peeler slip, and those things can hurt you! However, I usually skip the peeling and, instead, scrub them vigorously with a coarse sponge or a vegetable brush (fair warning: it may become stained permanently pink!)

Next, remove the leafy tops and the root. Don’t throw away the top! You can use those beet greens in a frittata.

Cube or slice the cleaned and trimmed beets, and toss them with a little olive oil and some salt. If I’m making these just for me, I go with small cubes (about 1/2″ square) for the fastest bake time. If I’m making them for a salad or to spread on a platter with some olive oil and balsamic vinegar (they’re also great with crumbly cheese and chopped walnuts), or really any other time I’m trying to make them pretty, cut them into (approximately) 1/4″ slices. The tradeoff for the prettier presentation is that they may take slightly longer to cook, so plan accordingly!

Line a baking sheet with aluminum foil or a nonstick pad and drizzle it lightly with oil. Transfer the prepared beets to the prepared sheet and make sure there is some space between them. If they’re too close together, the moisture each beet piece lets off as they roast will steam the ones next to it and they’ll get mushy!

Finally, roast them, low(ish) and slow, until they’re tender, sweet, and irresistible!

What to do with your roasted beets

The flavor of these is outstanding on their own, so you don’t have to “do” anything with them so much as sprinkle them with a generous pinch of good salt, and serve them as a side dish. They’re equally appropriate on Thanksgiving or a Tuesday.

You can also put them on a salad (My go-to is a roasted beet and pepita salad). They’re hearty and toothsome, providing a semi-meaty element to make a lunch salad that much more satisfying. If you’re doing a Whole30, these sweet little medallions do a great job standing in for dried fruit in salads.

But if you’re not following Whole30, these are the beginning of an amazing roasted beet salad. Toss them with some fresh baby arugula, some goat cheese, some rosemary, and a handful of toasted nuts, and drizzle it all with extra virgin olive oil and maybe a drizzle of balsamic vinegar, a pinch of kosher salt, and a sprinkle of freshly ground black pepper for a simple, yet unexpected, side salad.

You can slice them into a longer thinner shape and make them into fries. (Make sure you reduce your cooking time accordingly so they don’t burn!)

Once roasted, beets keep really well in the fridge for a week or more, and can even be frozen. So if you don’t have a use for these yet, don’t stress. They’ll be ready and waiting!

One last thing

The original post contained the following picture which was too cute not to keep. So, please enjoy this glamour shot of my cat, Henry.

Easy Roasted Beets #whole30 #paleo #vegan #21dsd
How to Roast Beets (To Make Delicious Roasted Beets!) #glutenfree #paleo #vegan #lowcarb #healthy

Simple Roasted Beets

Yield: 6 servings

Once you learn my simple trick for how to roast beets, you’ll never look at those funny root vegetables the same way again. Properly roasted beets are a far cry from those soggy tasteless pink slabs that come in a can. Roasted beets are sweet, rich, tender, and an incredible addition to salads – or great on their own! They’re naturally gluten free, paleo and vegan.

Ingredients

Instructions

  1. Preheat the oven to 350F. Line a large baking sheet with a nonstick pad or tinfoil lightly coated in nonstick spray. Set aside.
  2. Rinse, then scrub the beets with a brush or coarse sponge. Transfer to a plastic cutting board (if you use wood/bamboo, it may become permanently stained). Use a sharp knife to cut off the step and root ends of each beet, then chop into 1/2" cubes or 1/4" slices (which are prettier, but take longer to cook).
  3. Transfer cubes to a large mixing bowl and toss with oil, then salt (and other spices of choice, if desired).
  4. Spread the beet cubes in an evenly-spaced layer on the prepared baking sheet.
  5. Bake for 45-60 minutes or until beets are slightly crisp around the edges and tender in the middle. Again, remember that if you sliced the beets into discs or larger cubes, your bake time might be longer.

Notes

  • The reason this recipe doesn't call for peeling the beets is because I don't bother. After scrubbing the heck out of them and then roasting them, I don't notice the skin and it doesn't bother me. If you don't want to eat the skin, feel free to peel them while still raw. The easiest time to do this is when they are still whole, so you can grip each beet by the roots.
  • Store completely cooled beets in an airtight container for a week or more in the fridge, or up to 6 months in the freezer.

Recommended Products

As an Amazon Associate and member of other affiliate programs, I earn from qualifying purchases.

Nutrition Information:
Yield: 6 Serving Size: 1 beet
Amount Per Serving: Calories: 92Total Fat: 7gSaturated Fat: 1gTrans Fat: 0gUnsaturated Fat: 6gCholesterol: 0mgSodium: 235mgCarbohydrates: 7gFiber: 2gSugar: 5gProtein: 1g

Did you make this recipe?

Please leave me a comment below, or share a photo on Instagram and let me know what you think!


Easy Roasted Beets (#glutenfree, #vegan, #paleo, #lowcarb, and #whole30)

The post Perfect Roasted Beets (Or, How To Make Beets That Don’t Suck) appeared first on A Clean Bake.


Latest Images